Difference between revisions of "Install & Connect"
EvilManfred (talk | contribs) |
EvilManfred (talk | contribs) |
||
| (3 intermediate revisions by the same user not shown) | |||
| Line 65: | Line 65: | ||
top: -165px;"> | top: -165px;"> | ||
[[File:aispwiki.png|class=bottom|link=Main_Page]] | [[File:aispwiki.png|class=bottom|link=Main_Page]] | ||
</div> | |||
<div id=menubutton style=" | |||
left:-110px; | |||
top: 383px;"> | |||
[[File:totoparrow2f.png|class=bottom|link=#top|Back to Top]] | |||
[[File:totoparrow1f.png|class=top|link=#top|Back to Top]] | |||
</div> | </div> | ||
| Line 70: | Line 77: | ||
left:-140px; | left:-140px; | ||
top: 400px;"> | top: 400px;"> | ||
[[File: | [[File:mainmenu02f.png|class=bottom|link=Main_Page]] | ||
[[File: | [[File:mainmenu01f.png|class=top|link=Main_Page]] | ||
</div> | </div> | ||
<div id=menubutton style=" | <div id=menubutton style=" | ||
left:-110px; | left:-110px; | ||
top: | top: 450px;"> | ||
[[File: | [[File:tobotarrow2.png|class=bottom|link=#footer|Bottom of Page]] | ||
[[File: | [[File:tobotarrow1.png|class=top|link=#footer|Bottom of Page]] | ||
</div> | |||
<div id=menubutton style=" | |||
left:-140px; | |||
top: 450px;"> | |||
[[File:sbit.png|link=]] | |||
</div> | </div> | ||
<div id=menubutton style=" | <div id=menubutton style=" | ||
left:- | left:-90px; | ||
top: 450px;"> | top: 450px;"> | ||
[[File: | [[File:sbit2.png|link=]] | ||
</div> | </div> | ||
| Line 91: | Line 103: | ||
#p-logo { display:none; } | #p-logo { display:none; } | ||
#p-Quick_Navigation-label { | |||
color:orange; | |||
font-size:62%; | |||
text-shadow:0px 0px 4px black, 0px 0px 6px white | |||
} | |||
#p-tb-label { | |||
color:orange; | |||
font-size:62%; | |||
text-shadow:0px 0px 4px black, 0px 0px 6px white | |||
} | |||
#n-Download-the-Game a { | |||
color:#FAF9F6; | |||
font-size:94%; | |||
text-shadow:0px 0px 4px #0000FF, 2px 2px 8px black | |||
} | |||
#n-Join-the-Discord a { | |||
color:#FAF9F6; | |||
font-size:94%; | |||
text-shadow:0px 0px 4px #0000FF, 2px 2px 8px black | |||
} | |||
#n-Visit-the-Website a { | |||
color:#FAF9F6; | |||
font-size:94%; | |||
text-shadow:0px 0px 4px #0000FF, 2px 2px 8px black | |||
} | |||
#n-Install-Guide a { | |||
color:white; | |||
font-size:86%; | |||
text-shadow:0px 0px 4px #0000FF, 2px 2px 8px black | |||
} | |||
#n-Skills-Overview a { | |||
color:white; | |||
font-size:86%; | |||
text-shadow:0px 0px 4px #0000FF, 2px 2px 8px black | |||
} | |||
#n-Custom-Content a { | |||
color:white; | |||
font-size:86%; | |||
text-shadow:0px 0px 4px #0000FF, 2px 2px 8px black | |||
} | |||
#n-Wiki-Credits a { | |||
color:white; | |||
font-size:86%; | |||
text-shadow:0px 0px 4px #0000FF, 2px 2px 8px black | |||
} | |||
#t-whatlinkshere { display:none } | |||
#t-recentchangeslinked { display:none } | |||
#t-info { display:none } | |||
#t-relatedchanges { display:none } | |||
#t-permalink a { | |||
color:white; | |||
font-size:82%; | |||
text-shadow:0px 0px 4px #0000FF, 2px 2px 8px black | |||
} | |||
#t-print a { | |||
color:white; | |||
font-size:82%; | |||
text-shadow:0px 0px 4px #0000FF, 2px 2px 8px black | |||
} | |||
#t-specialpages a { | |||
color:white; | |||
font-size:82%; | |||
text-shadow:0px 0px 4px #0000FF, 2px 2px 8px black | |||
} | |||
#cf { | #cf { | ||
| Line 113: | Line 202: | ||
position:absolute; | position:absolute; | ||
left:0; | left:0; | ||
-webkit-transition: opacity 0 | -webkit-transition: opacity 0.2s ease-in-out; | ||
-moz-transition: opacity 0 | -moz-transition: opacity 0.2s ease-in-out; | ||
-o-transition: opacity 0 | -o-transition: opacity 0.2s ease-in-out; | ||
transition: opacity 0 | transition: opacity 0.2s ease-in-out; | ||
} | } | ||
| Line 122: | Line 211: | ||
position:absolute; | position:absolute; | ||
left:0; | left:0; | ||
} | } | ||
| Line 131: | Line 216: | ||
position:fixed; | position:fixed; | ||
left:1; | left:1; | ||
bottom: | bottom:0; | ||
-webkit-transition: opacity 0 | -webkit-transition: opacity 0.2s ease-in-out; | ||
-moz-transition: opacity 0 | -moz-transition: opacity 0.2s ease-in-out; | ||
-o-transition: opacity 0 | -o-transition: opacity 0.2s ease-in-out; | ||
transition: opacity 0 | transition: opacity 0.2s ease-in-out; | ||
} | } | ||
| Line 161: | Line 246: | ||
==Using the launcher== | ==Using the launcher== | ||
1) Download the launcher [https://drive.google.com/file/d/1Rsur1WoEhkvmTMB3b6iFpHn_4Ar97WGQ/view?usp=sharing here] <br> | 1) Download the launcher [https://drive.google.com/file/d/1Rsur1WoEhkvmTMB3b6iFpHn_4Ar97WGQ/view?usp=sharing here]. <br> | ||
2) Double-click setup to install the launcher. <br> | 2) Double-click setup to install the launcher. <br> | ||
3) Run the launcher. <br> | 3) Run the launcher. <br> | ||
| Line 179: | Line 264: | ||
Port – 2593 | Port – 2593 | ||
===Shard Accessibilty=== | ===Shard Accessibilty=== | ||
Latest revision as of 14:26, 23 April 2023


![]()
![]()
![]()
![]()


![]()
![]()


![]()
![]()
![]()
![]()
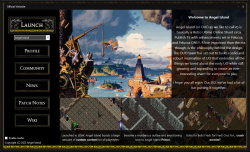
Install & Connect
The launcher will install both Angel Island and Siege Perilous all at once. Both shards are available through the server listing once logged in to the game.
Using the launcher
1) Download the launcher here.
2) Double-click setup to install the launcher.
3) Run the launcher.
4) Create a Profile and Install the game to your desired location.
5) Select Launch in the top right corner.
Enjoy the game and please check Getting Started for help with gameplay. You can also Ask a Guard for help or even another player in the Angel Island Discord.
Downloads
UO Cartographer - Map Assistant
Connect
Server IP/Name – uoangelisland.com
Port – 2593
Shard Accessibilty
Currently Angel Island has 3 shards available to connect to.
Angel Island – This is the live production server. Create your character and get immersed in the best MMO ever made!
Siege Perilous TC – This is our test center. It gives players the ability to test different skills and functionalities of the shard without having to worry about resources or time. Right now you can enjoy all of those test features on Siege Perilous by logging in to this shard.
Siege Perilous - A classic Siege Perilous shard, currently open to the public for a live beta test.